You don’t need a lot of equipment when it comes to running; lace up your shoes (and if you have it, wear a Fitbit tracker), and you’re good to go. But there is a tool that can help speed muscle recovery and improve your performance: a foam roller.
“Foam rolling is like giving yourself a deep-tissue massage,” says physical therapist and running specialist, Abby Douek, owner of Run Raleigh PT. Douek recommends rolling both before and after runs, depending on your objectives. “When you have inefficiencies in your gait pattern (read: problems with your form due to tight muscles), it can be helpful to foam-roll first to loosen muscles,” she says.
Rolling after your runs can help muscles relax, and improve circulation to speed recovery time. “It reduces restrictions in the body’s connective tissue—and, if you pause and press on tight, sore spots, can mimic many of the effects of Active Release Therapy (ART)—a newer type of bodywork performed by physical therapists,” Douek says. “Foam rolling isn’t always going to fix underlying problems, but it is a great way to prevent them.”
An effective foam-roll session also involves less time than you think. “It only takes five or six minutes,” says Douek. “You really only need to hit each area for 30 seconds to be effective.”
To help loosen your running muscles, focus on these five areas:
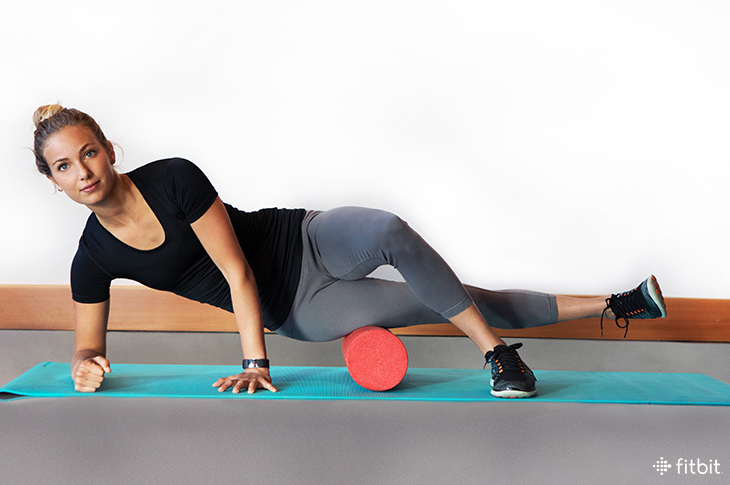
Glutes
The glutes are one of the main drivers of a powerful stride, which is one of the reasons they can get tight from lots of running.
Sit on the roller and then cross your right ankle over your left knee. Focus on (very) slowly rolling the right glutes. Switch legs and sides. If you’re time-strapped, spend time on the outer edges of your glutes, which are usually the tightest spots.
Hamstrings
The muscles on the backs of your thighs can get strained and weak from sitting, and when worked hard during running, can become even more sore.
Sit on the floor with your right leg extended, and your left leg bent, with your left foot flat on the floor. Position the foam roller under the back of your right thigh. Put your weight on the roller, and roll (slowly) from just above the back of your knee to your glute. Spend 30 seconds on the inner muscles toward the center, and then lean outward for 30 seconds. You can cross one leg over the other if you want more pressure on the roller. Switch sides.
Calves
The calf muscles help absorb impact forces, assist in balance, and create your push off. Calves that are too tight can lead to Achilles tendon and foot issues, as well as get painfully sore themselves and limit your running.
Place the foam roller under your right leg, just below the knee. Focus on the belly of the muscle, from where it bulges to the back of the knee, and avoid the Achilles tendon. Roll for 30 seconds on the inner side, 30 seconds toward the middle, and then 30 seconds on the outer side. Switch sides.
Quads
These large muscles help stabilize your knee, and they also absorb impact, especially when running downhill.
Lie face-down with the roller placed under your right thigh, and roll straight from your knee to your hip for 30 seconds. Then lean toward the center of your body and roll for 30 seconds, then lean toward the outside. Switch sides.
Hip Flexors
These muscles pull the knee up when you run. Since we often spend too much time sitting, they get short and can inhibit a full, effective stride.
Place the edge of the foam roller under the front of your right hip while lying face down. Drop your opposite hip so the pressure is on the muscles inside of the hip, not on the bone in front. Roll for 30 seconds from the top of your quad muscles up toward your abdomen, going as high as your belly button. Switch sides.
IT Band Attachments
The IT (iliotibial) Band runs along the outside of your leg from above your hip to below your knee, and assists with leg stability. Avoid rolling on the tendon itself, as it’s often inflamed. Instead, loosen surrounding tissues, which can affect it.
First, lie on your side and position the roller between your hip and your waist. Roll over the area—approximately six-inches from the top of your pelvis to your outer hip—stopping before the bone. This is the upper attachment of the ITB and controls its tension. Then roll along the edges of the tendon on the outside of the thigh, releasing adhesions at the IT Band junctions with the quads in front, and the hamstrings in the back. You can place one foot flat on the floor, to help control your movement as your roll.
This information is for educational purposes only and is not intended as a substitute for medical diagnosis or treatment. You should not use this information to diagnose or treat a health problem or condition. Always check with your doctor before changing your diet, altering your sleep habits, taking supplements, or starting a new fitness routine.
Jonathan Beverly

Jonathan Beverly is freelance writer and author of Your Best Stride and Run Strong, Stay Hungry. The former editor-in-chief of Running Times, he draws on decades of experience in the sport. He has run 26 marathons with a 2:46:04 best. Jonathan also coaches high school cross country.
This is a decent article, but would be greatly improved by adding photos.